Insultex House Wrap Review (R-6): Real-World Performance, Specs, and Contractor Detailing Guide
Updated: Region: New Jersey (Mixed-Humid, Zones 4A–5A) Type: Field review + practical install reference
Insultex is an insulated house wrap designed to function as a weather-resistive barrier (WRB) while adding thermal resistance in a very thin profile. We’ve used it on New Jersey projects where we wanted better comfort and a tighter envelope without changing wall thickness or forcing complicated trim and jamb extensions.
Key takeaways (for fast decision-making):
- Best fit: New builds, additions, and re-sides where you want performance gains with near-zero build-out.
- It still requires precision: laps, seam tape pressure/rolling, flashing integration, and penetration details.
- It’s vapor-permeable: designed to allow drying while controlling bulk water as a WRB.
- Local reality: energy code compliance is assembly-specific; treat this as a layer within a complete wall section and confirm with your reviewer.
Editorial note: This is an independent field review written from a contractor perspective. It is published for education and professional reference. We are not the manufacturer.
Rating reflects install practicality, detailing clarity, and “does it reduce complexity while improving performance” on real projects.
Pros
- Thermal improvement with near-zero build-out
- Familiar WRB workflow: laps, fasteners, taped seams
- Less trim and jamb complexity than thick exterior insulation layers
- Better comfort potential by reducing drafts and cold-wall feel
Cons
- Availability can vary; plan procurement early
- Needs careful handling to avoid jobsite damage before siding
- Performance depends on correct flashing and penetration detailing
Best for
- New construction, additions, and full re-sides
- Comfort-focused builds (tight feel, reduced drafts)
- Projects where you want performance gains without thickness
Not ideal for
- Crews that won’t tape/roll seams and treat penetrations carefully
- Projects that already have a full exterior continuous-insulation strategy designed
- Schedules where the WRB will be left exposed beyond the product’s UV exposure limit
What Insultex is (and how it differs from typical wraps)
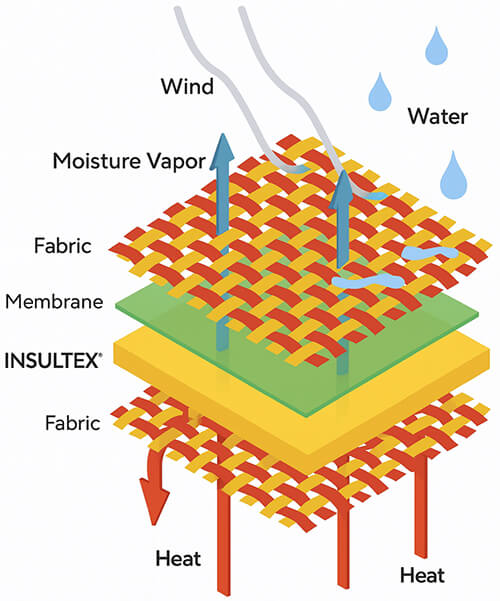
Insultex is an insulated house wrap intended to function as a WRB while adding thermal resistance in a very thin layer. Conceptually, it’s trying to do two jobs at once: protect the wall from bulk water and wind-driven rain, and reduce heat flow. For builders and remodelers, the practical win is simple: you can improve the wall’s performance without changing exterior geometry.
Specs and test data (what the documentation actually says)
The numbers below are from published product documentation. Your real-world results depend on continuity, detailing, and the full assembly (sheathing, cavity insulation, cladding, and air-sealing strategy).
| Property | Published value | Test method (as listed) | Why it matters |
|---|---|---|---|
| Thickness | ~1.1 mm | Listed on technical data sheet | Controls trim/jamb complexity and helps preserve standard detailing. |
| Thermal resistance | R-6 (product sample) | ASTM C518 (Modified) | Thermal layer contribution, especially at thermal bridges. |
| Air permeance | 0.001 (listed; sheet notes < 0.02) | ASTM E2178 | Air control depends on taped seams, transitions, and penetrations. |
| Vapor permeance | 15 perms | ASTM E96B | Supports outward drying in mixed-humid assemblies (not a “vapor barrier”). |
| Water resistance | 250 cm water | AATCC-127 | Bulk-water control behind cladding depends on lapping and flashing details. |
| UV exposure rating | 120 days | Listed on technical data sheet | Plan sequencing so the WRB isn’t left exposed longer than allowed. |
Important: R-values are not “magic.” You only get performance when the layer is continuous and integrated. Treat Insultex like a WRB first, then an air-control layer (taped seams), and only then “bonus” thermal value.
Where Insultex fits best (real-world decision support)
In our experience, Insultex is most useful when you’re trying to avoid the downstream detailing pain that comes with thicker exterior insulation layers, but still want a meaningful performance upgrade.
Best use cases
- Re-siding projects: improves comfort without re-engineering every opening.
- Additions: easy to tie into existing walls and transitions when detailed carefully.
- New construction: supports tighter dry-in and performance-forward assemblies.
- Window-heavy elevations: minimal thickness helps keep flashing and trim straightforward.
Red flags (when not to force it)
- Long exposure windows where the wrap could be left uncovered too long
- Crews that won’t roll tape, seal penetrations, or follow shingle-lap logic
- Assemblies that already have a designed continuous-insulation strategy and details set
- Situations where the WRB plane is not clearly defined in the wall section
Performance notes (what we see on job sites)
- It can help the house “feel tighter” when seams are taped and penetrations are treated like real air-barrier details.
- It reduces geometry problems because you don’t create thick build-outs that cascade into trim, flashing, and accessory rework.
- It still needs a drainage mindset: lapping, sequencing, and correct window integration matter as much as the material itself.
Contractor detailing guide (the parts that make or break it)
The goal is a continuous WRB plane with clean water-shedding laps and a continuous air-control plane where seams and transitions are sealed. If you already do high-quality WRB installs, Insultex fits right into that discipline.
1) Laps, seams, and fastening
- Shingle-lap the courses so upper layers always lap over lower layers (water sheds outward).
- Keep laps consistent (avoid “reverse laps”).
- Fasten flat and tight so the wrap stays in contact with the substrate (wrinkles create failure points).
- Tape seams and apply firm pressure. A roller is not optional when you want repeatable adhesion.
2) Windows and doors (sequence, not shortcuts)
- Use shingle-style flashing logic: sill first, then jambs, then head/drip cap, then integrate WRB over the head.
- Avoid “tape-only” installs: follow the window manufacturer’s instructions for pan, sealing, and flange details.
- Make the WRB plane obvious: if a detail is ambiguous, it will fail under wind-driven rain.
3) Penetrations and transitions
- Use boots where possible for pipes and vents instead of ad-hoc tape patches.
- Plan your transitions (foundation to wall, decks, roof-to-wall, band boards) so the WRB is continuous.
- Don’t bury problems: if a transition is sloppy, fix it before cladding makes it inaccessible.
Installation workflow (practical, repeatable)
- Substrate prep: sheathing flat, dry, and free of protruding fasteners.
- Layout: start low and work up; keep courses level and shingle-lapped.
- Fasten: cap nails or staples per your WRB plan; keep the wrap flat and tight.
- Seams: tape all seams and roll/press for full bond. Check adhesion as you go.
- Openings: integrate sill, jamb, and head flashing in correct sequence; follow window instructions.
- Penetrations: use boots or compatible flashing details; tape alone is rarely enough long-term.
- Pre-cladding review: do a full walk with a checklist before siding closes it all in.
Common mistakes we see (and how to avoid them)
- Reverse laps: water gets driven behind the WRB. Fix it immediately.
- Unrolled tape: adhesion fails over time. Roll it and keep surfaces clean.
- “Tape solves everything” thinking: windows still need proper sill and head flashing logic.
- Ignoring penetrations: small gaps become major air leaks and water entry points.
- Leaving it exposed too long: plan sequencing and protect the wrap within the exposure window.
QC checklist before cladding (print this, use it)
- All seams taped and firmly rolled/pressed
- No reverse laps; all courses shingle-lapped correctly
- Inside and outside corners tight and sealed as needed
- Windows and doors flashed in correct sequence (sill, jamb, head) and integrated with WRB
- Penetrations booted or properly flashed, then sealed to the WRB plane
- Transitions addressed (foundation, decks, roof-to-wall, band boards)
- Any tears or jobsite damage patched with compatible materials
- Plan confirmed for rainscreen or drainage space where the cladding requires it
Code considerations in New Jersey (keep it simple and defensible)
Energy compliance is jurisdiction-specific and depends on the full wall assembly. In New Jersey, the low-rise residential energy subcode references the 2021 IECC. That means your compliance path is typically documented via prescriptive R-values or the U-factor alternative, plus required air sealing/testing.
Best practice for plan review: Submit a wall section that clearly labels the WRB/air-control plane and shows how windows, penetrations, and transitions stay continuous. Then confirm acceptance with the local code official before ordering.
Local note: NJ climate zones
NJ is split into Climate Zone 4A and 5A by county. If you’re near the line, don’t guess. Confirm your zone and model your assembly accordingly.
Cost factors (what actually moves the number)
Insultex is typically a premium WRB. The installed cost is driven by material availability, accessory/tape planning, and crew discipline. The fastest way to waste money is rework at openings and missed details that force teardown.
Budget planning checklist
- Roll coverage: calculate net wall area, then add waste for laps, corners, and complex elevations.
- Seam tape: budget enough for all vertical seams, transitions, and repairs.
- Flashing: treat window/door flashing and penetration boots as separate line items.
- Rainscreen (if required): budget furring/mesh and fasteners per cladding spec.
- Quality control time: a 20-minute QC walk is cheaper than a siding tear-off.
Where to buy and how to specify it (so you get the right product)
Availability can vary. Start by confirming the exact SKU, roll size, and the matching seam tape. If your local supplier doesn’t stock it, many can special order when you provide a clear spec.
Spec it clearly
- Product: Insultex house wrap (verify the R-value version you are ordering)
- Roll size: 5 ft x 100 ft (500 sq ft) where applicable
- Accessories: manufacturer seam tape and compatible flashing approach
- Exposure planning: confirm schedule so wrap is covered within the allowed exposure window
FAQ (short, direct answers)
Is Insultex a WRB or “just insulation”?
Treat it as a WRB first. The thermal value is a benefit, but bulk-water control and correct flashing integration are what protect the building.
Is it vapor permeable?
Yes, published documentation lists vapor permeance at 15 perms. That supports outward drying when the rest of the assembly is designed correctly.
How thick is it?
The technical data sheet lists thickness around 1.1 mm. That thin profile is why window and trim geometry usually stays familiar.
How long can it be exposed before siding?
The technical data sheet lists a 120-day UV exposure rating. Plan sequencing so you stay inside that window.
Do seams need to be taped?
If you want air-control performance, yes. Tape seams and apply firm pressure (roller recommended) so adhesion is repeatable.
Does it change window and trim details?
Typically, the thin profile reduces the need for custom jamb extensions compared to thicker exterior build-outs. Flashing sequence still matters.
Can it help with energy code requirements?
It can be part of a compliant assembly, but energy compliance is based on the entire wall system and the accepted compliance path. Submit the wall section and confirm with the local reviewer.
What should be inspected before cladding?
Tape and roll seams, verify laps, confirm window flashing sequence, seal penetrations, and resolve transitions (foundation, decks, roof-to-wall). Use the QC checklist above and document with photos.
Final verdict
If your goal is a tighter, more comfortable envelope with practical job-site detailing and minimal disruption to exterior geometry, Insultex is a strong option. It rewards clean workmanship, integrates well when flashing is done correctly, and can help you push performance without turning the exterior into a custom trim engineering project.
Want this wall system detailed correctly for a New Jersey build?
We work with architects, homeowners, and investors on custom new homes, home additions, ADUs, and garages/outbuildings. If you’re considering Insultex or another high-performance exterior assembly, we help define a buildable wall section, durable opening details, and a constructible sequencing plan that protects the WRB plane.
Request an itemized project quote Schedule a wall-section consultAbout this review, disclosures, and update policy
- Independence: We are not affiliated with the manufacturer and do not accept paid placement for this review.
- Scope: Contractor field perspective. We are not performing laboratory testing for this article.
- Code note: Code acceptance and energy compliance vary by jurisdiction and full assembly design. Confirm with your local official.
- Updates: We update this page when published documentation, code adoption, or field learnings change.
Sources and documentation (primary links)
Author
Sources
- BRC Laboratory. Certificate of Analysis: Insultex House Wrap R-6 . Modified ASTM C518 with 0.75 in air gaps noted.
- Insultex House Wrap. Technical Data Sheet . Product properties and test references.
- International Code Council. 2021 IECC, Chapter 4 RE: Residential Energy Efficiency . Prescriptive R-values and U-factor alternative.
- New Jersey Department of Community Affairs. Current Construction Codes . Confirms NJ adoption of 2021 IECC.
- Federal Trade Commission (FTC). FTC Charges Purported Insulated House Wrap Marketer with Making False Claims . FTC press release announcing the enforcement action (Nov 4, 2016).
- U.S. District Court (W.D. Pa.). Federal Trade Commission v. Innovative Designs, Inc. — Memorandum Opinion & Order (W.D. Pa.) (PDF) . District court decision entering judgment in favor of Innovative Designs (Sept 24, 2020).
- U.S. Securities and Exchange Commission (SEC) EDGAR. Innovative Designs, Inc. — Form 10‑Q (Litigation Note re: fee/cost settlement order) . Company filing describing the June 29, 2022 settlement order and payment to resolve fee/cost claims.
Show 1 additional reference
- Johns Manville. AP Foil-Faced Polyiso Continuous Insulation Data Sheet . Lists 1 in polyiso at R-6.0.