Steam Shower Waterproofing Guide: Vapor Control, Membranes, and QC Checklist
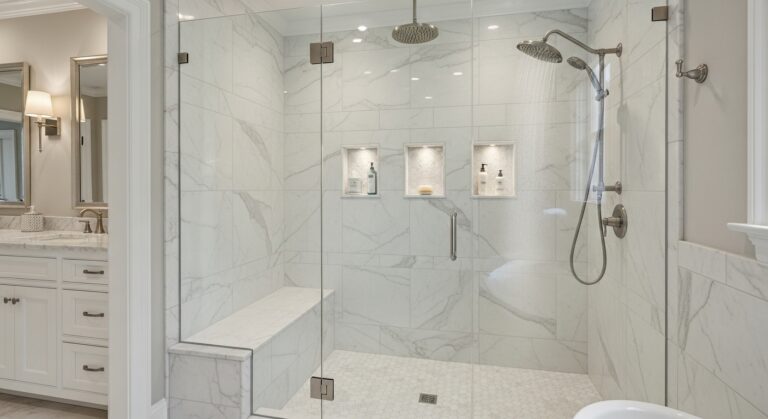
Updated: Scope: Residential steam showers (intermittent use) + small steam rooms Type: Contractor build guide + photo-based QC checklist Example profile: 5′ × 5′ × ~7.5′ tiled enclosure, porcelain walls, mosaic floor
A steam shower is a wet room plus a vapor-managed enclosure. Bulk water control is not enough. You need a continuous membrane strategy (walls, ceiling, and floor), verified vapor performance, compatible materials, and disciplined detailing at corners, drains, and penetrations.
Key takeaways (fast answers):
- Start with the membrane spec: use a membrane rated for steam and verify its perm rating (and the test method) before you buy.
- Waterproof the ceiling: a steam shower ceiling is a primary exposure surface, not an afterthought.
- Plan slope early: ceiling pitch helps manage condensate and keeps tile and glass coordination clean.
- Choose one system family: membrane + corners + bands + collars + drain method + mortars should be compatible and documented.
- Penetrations are part of the enclosure: treat valves, lights, speakers, and the steam outlet penetration like roof penetrations, not “caulk later.”
- Govern with photos: capture waterproofing and detailing before tile hides the work.
Editorial note: This is an independent contractor-built guide for education and professional reference. It does not replace TCNA methods, manufacturer instructions, local codes, or stamped design details.

TCNA steam room methods
SR613/SR614 + manufacturer documentation
Step-by-step + QC checks
Photo documentation before tile
Home Builder Lic #50855
HIC #13VH10321300
How to use this guide
- Nationwide: use this as a spec sheet and QC checklist to compare bids and verify your installer’s membrane and detailing plan.
- Design teams: use the “high-risk details” section to lock in penetrations, slopes, and blocking before tile work begins.
- Builders: use the process steps and photo checklist to prevent “covered-up” failures.
What a steam shower is (and why waterproofing is not enough)
Steam showers and steam rooms are typically operated at high humidity, and the enclosure is exposed to sustained vapor drive through grout lines and micro-gaps. Industry guidance distinguishes residential intermittent use from commercial continuous use, because the duty cycle changes the risk profile and vapor management requirements.
Steam shower vs standard shower
- Standard shower: bulk water is the primary control problem.
- Steam shower: bulk water and vapor transmission management are primary problems.
- That is why steam-rated membrane selection and ceiling detailing matter more than brand selection.
Residential vs commercial exposure
- Steam rooms/showers are commonly classified as Res4 (residential intermittent) or Com4 (commercial continuous).
- Use TCNA Handbook methods as a baseline: SR613 (masonry/concrete) and SR614 (stud/backer board option).
- Always align with the membrane manufacturer’s steam-room method and warranty language.
Specs and test criteria (what to verify before ordering materials)
The goal is to make this inspectable. Before you commit to a membrane or system, confirm the criteria below in current documentation. If a data sheet does not disclose the key properties (especially vapor permeance and test method), treat that as a risk signal.
| Control | Recommended criterion | Where to confirm | Why it matters |
|---|---|---|---|
| Tile suitability | Tile meets ANSI A137.1 and is recommended for steam applications by the tile manufacturer. | Tile manufacturer documentation + TCNA steam room guidance. | Reduces risk of moisture/thermal cycling issues and finish failure. |
| Waterproof membrane standard | Membrane meets ANSI A118.10 and is rated/recommended for steam by the membrane manufacturer. | Membrane data sheet + manufacturer install handbook. | Steam rooms require specialty membranes designed to bond to substrates and accept thin-set tile. |
| Vapor permeance (perm rating) | Bonded wall/ceiling membrane has a perm rating of 0.5 perms or less, or use a secondary vapor strategy when required by method and duty cycle. | Membrane technical data + TCNA/industry steam room references. | Limits vapor migration into cavities and adjacent finishes. |
| Perm test method | Perm rating is tested to ASTM E96 Procedure E (steam-relevant conditions are often referenced in industry guidance). | Membrane data sheet (look for ASTM E96 Procedure E language). | “Perm” without the correct test context is not comparable across products. |
| Ceiling slope | Ceiling slopes toward a wall at a meaningful pitch (commonly referenced: 2″ per foot). | Detail set + manufacturer method + project design. | Reduces condensate dripping and improves comfort during use. |
| Floor slope | Floor slope to drain is maintained (commonly referenced: 1/4″ per foot). | Pan/mud-bed layout + drain detail. | Standing water drives grout discoloration, slip risk, and maintenance issues. |
| Benches + ledges | All horizontal surfaces slope to drain (commonly referenced: 1/8″ per foot minimum). | Bench/niche detail drawings + field verification. | Flat benches create chronic wetting and reduce durability. |
| Substrate suitability | Avoid gypsum drywall in steam room assemblies; use substrates supported by steam-room methods and manufacturers. | TCNA guidance + board manufacturer documentation. | Steam exposure accelerates failure modes in gypsum-based assemblies. |
| Flood test plan | Plan a pan test before tile (duration and inspection requirements vary by jurisdiction and method). | Local code/inspector requirements + manufacturer instructions. | Finds leaks while repair is still cheap and accessible. |
Best fit (and what this guide intentionally excludes)
Best fit
- Homeowners and design teams planning a tiled steam shower and wanting a verified enclosure assembly.
- Builders who want a governed membrane + drain strategy with fewer field-invented details.
- Projects using porcelain tile, especially large-format wall tile.
Not covered here (by design)
- Steam generator sizing, electrical design, and plumbing design (follow manufacturer instructions and local code).
- Specialty commercial continuous-use engineering details beyond typical residential scopes.
- Unverified shortcuts or “mix and match” materials without explicit compatibility.
Want an installer-ready steam shower detail set?
Use this guide as your baseline, then lock in your exact membrane family, drain method, glass layout, and penetration schedule. If your project is in New Jersey, we can scope and build it. If you’re outside our region, you can still use this page as a bid vetting checklist.
Call 888-655-0064 or use the estimate form to share your basics: enclosure size, tile format, glass layout, niche/bench count, and drain approach.
Request an estimate Email or schedule a callPrivacy note: share only what you want. Prefer no form: call us.
System selection: the lowest-risk path for most steam showers
Reliability is less about brand and more about a governed system: vapor control, waterproofing continuity, drain integration, and penetration detailing that is documented and repeatable. The lowest-risk path is a steam-rated system where the membrane, seams, corners, collars, and drain interface are designed to work together.
Decision logic (simple and field-proven)
- Choose your control layer strategy. Decide where vapor and waterproof control will live: surface membrane (most inspectable) or another documented approach.
- Choose one system family. Keep membrane, bands, corners, collars, drain method, and mortars within an ecosystem or explicit compatibility list.
- Pick a drain approach that matches the membrane. Do not improvise the drain transition.
- Plan penetrations before membrane. Count them, locate them, and choose collar/sealant methods in advance.
Steam shower assembly blueprint (brand-neutral)
The assembly below is written for typical residential framed construction with porcelain tile. It prioritizes inspectability and continuity. Always adapt to manufacturer methods and your project’s structural conditions.
Walls (framed construction)
- Stud framing, straightened and blocked for glass, doors, and accessories
- Unfaced insulation in bays (mineral wool or fiberglass installed without voids)
- 1/2″ cement board or another substrate documented for steam assemblies
- Continuous steam-rated membrane on the face of the substrate
- Compatible mortar (often ANSI A118.15 class where specified)
- Porcelain tile
- Movement joints at changes of plane (sealant, not grout)
Ceiling (steam-critical)
- Ceiling slope planned and framed before board
- Continuous insulation above ceiling plane
- 5/8″ cement board preferred for stiffness where feasible
- Continuous membrane across ceiling and into corners
- Overhead tile-setting method verified for mortar and tile weight
Floor (mosaics)
- Sloped mortar bed to drain (governed geometry, strong long-term performance)
- Membrane carried to and integrated with drain method
- Mortar suitable for mosaics and wet service
- Mosaic tile sheets set to preserve slope and drainage

High-risk details (where steam showers fail)
Most steam shower failures are not in the “field” of the wall. They occur at transitions and interfaces: corners, benches, niches, curbs, windows, drains, and penetrations. Treat these like critical envelope details.
Ceiling plane + corners
- Use a stiff ceiling substrate and proper fastening to reduce deflection and tile stress.
- Carry membrane continuously across the ceiling and down the walls with documented seam methods.
- Do not “stop the membrane at the top row.” Steam does not respect that line.
Benches, niches, and ledges
- Slope every horizontal surface toward the drain.
- Preform or reinforce inside/outside corners; don’t rely on “extra caulk” at geometry changes.
- Keep fasteners out of wet-zone faces whenever possible.
Curbs, thresholds, and glass interfaces
- Do not penetrate the top of curbs with fasteners unless the method explicitly allows it.
- Coordinate glass and hardware early to reduce last-minute penetrations through membrane.
- Use movement joints and compatible sealants at glass-to-tile transitions.
Membrane options (steam-appropriate categories)
Steam showers are not the place to guess. Choose a membrane type that is explicitly supported for steam by current documentation, then follow the full system method. Sheet membranes are often the most repeatable in the field. Liquids can be excellent when thickness and cure are tightly controlled.
| Approach | Why it is used | Primary tradeoff | Field risk to control |
|---|---|---|---|
| Sheet membrane system | Consistent thickness, defined seam methods, accessories for corners and penetrations | More seams than liquids, requires careful overlap and embedding | Incomplete seam bonding, missed corners, sloppy collars |
| Liquid-applied membrane | Great for complex shapes, fewer seams, continuous coating possible | Performance depends on verified thickness and cure windows | Under-build film thickness, pinholes, rushed curing |
| Board-based systems (steam-rated) | Fast plane creation, simplified transitions when system is complete | Performance is seam/tape/sealant dependent | Under-sealed seams, unverified penetrations, incompatible accessories |
Insulation (recommended even on interior walls)
Insulating walls and the ceiling improves comfort and steam retention and can reduce condensation potential. For many residential builds, unfaced insulation in the bays is typically the cleanest approach.
Preferred
- Unfaced mineral wool for stability and sound control.
- Unfaced fiberglass if installed without voids or compression.
- Air seal obvious bypasses before board goes up.
Avoid (unless a documented method requires it)
- Kraft-faced batts and interior poly used as an extra vapor layer behind a low-perm surface membrane.
- Random extra layers that can create trapped moisture conditions.
Wall board and ceiling build
The membrane is your control layer, but the board is your stability layer. For porcelain tile, especially large-format, flatness and stiffness are major durability inputs.
Preferred substrate strategy (typical residential)
- Walls: 1/2″ cement board (CBU) or another substrate documented for steam assemblies.
- Ceiling: 5/8″ cement board preferred where feasible for stiffness.
- Plan fastener layout and blocking to reduce later penetrations through the membrane.
- Correct planes and substrate flatness before waterproofing, not after.

Pan and drain strategy
For steam showers, we generally prefer surface waterproofing tied directly into the drain detail rather than relying solely on a buried liner approach. A traditional liner can be installed correctly, but it raises the importance of drain weep paths and compatibility discipline.
Preferred: surface membrane floor
- Sloped mortar bed to drain
- Continuous membrane on the floor tied into a documented drain method
- Reduces reliance on saturated mortar bed behavior
Traditional liner (PVC/rubber)
- Time-tested when detailed correctly
- Depends heavily on proper drain weep paths
- Higher risk if someone later adds incompatible surface membranes

Thinset and grout (governed, no guessing)
Use mortars and grouts appropriate for porcelain, wet service, and the selected membrane system. For large-format porcelain on walls, non-sag large-and-heavy-tile mortars are commonly used. For floor mosaics, trowel selection and coverage discipline matter to avoid voids and uneven surfaces.
Walls: large-format porcelain
- Plan substrate flatness and layout to reduce lippage risk.
- Use a mortar category intended for porcelain and wet service, compatible with your membrane system.
- Verify coverage with periodic pull checks during install.
Floor: mosaics
- Use a smaller notch and beat-in technique to limit squeeze-through.
- Confirm slope is preserved while setting sheets.
- Check for sheet alignment and lippage at transitions.
Penetrations, sealants, and movement joints
Steam showers fail at interfaces: corners, penetrations, drains, and transitions. Use system collars where available and treat movement joints as movement joints.
Changes of plane
- Use a flexible sealant at changes of plane (silicone is commonly specified for tile movement joints).
- Do not grout corners and expect long-term performance under heat cycling.
- Keep joints clean and sized so sealant can perform.
Steam outlet penetration (steam head)
- Seal the steam outlet penetration per the steam generator manufacturer’s instructions using the specified high-temperature sealant.
- Do not grout the steam outlet fitting.
- Plan placement to reduce direct steam impact on door seals and hardware.
Penetration schedule (do this before waterproofing)
- List every penetration: shower valve(s), head(s), hand shower, body sprays, lights, speakers, steam outlet, controls, niches/LEDs.
- Choose a collar/detail method for each (preformed collar, banded detail, or reinforced liquid detail).
- Confirm the sealant type required at high-temperature penetrations.
- Photograph each completed penetration detail before tile.

Install workflow (sequence that prevents rework)
- Define the system. Choose a steam-appropriate membrane family and keep drains, bands, corners, collars, mortars, and sealants compatible.
- Frame for performance. Straighten studs, add blocking for glass/accessories, and frame the ceiling slope.
- Plan penetrations. Lock in the penetration schedule and select collar/detail methods before membrane work begins.
- Insulate and prep. Install unfaced insulation without voids and air seal obvious bypasses.
- Install board and achieve flatness. Correct planes before waterproofing, not after.
- Install membrane continuously. Walls, ceiling, and floor are part of the same vapor-managed enclosure.
- Integrate the drain. Tie the membrane into the drain per the documented method.
- Verify and document. Photo the drain tie-in, corners, seams, benches/niches, and penetrations before tile.
- Set tile with verification. Control layout, maintain floor slope, and verify coverage during installation.
- Finish correctly. Grout the field, seal changes of plane with sealant, and seal high-temperature penetrations per manufacturer guidance.
Practical QC checklist (print and use)
| Phase | What to verify | Why it matters |
|---|---|---|
| Before board |
|
Prevents late penetrations and redesign that compromise continuity. |
| Before membrane |
|
Large-format tile needs flat planes and stable substrates. |
| After membrane |
|
This is the real enclosure. Tile does not fix membrane defects. |
| Before grout |
|
Prevents hidden voids, poor drainage, and cracked corners. |
Code considerations (inspection mindset)
- Flood testing: Many jurisdictions require a shower liner or receptor water test. Confirm your local requirements and your system manufacturer’s test method before tile.
- Electrical: Any lights, speakers, and controls must be selected and installed per code and manufacturer requirements for wet/steam environments.
- Ventilation: Plan a post-steam dry-out strategy (fan timer, door operation, and routine maintenance) to support long-term cleanliness and durability.
Pricing guidance (drivers only)
- Tile format and layout: large-format tile increases substrate prep and layout control needs.
- Glass complexity: heavier glass and more hardware increases coordination and penetration planning.
- Pan strategy and drain selection: linear drains and custom mud beds can change labor scope.
- Feature count: benches, niches, and multiple penetrations increase detailing and QC demands.
Timeline and logistics (what commonly delays steam showers)
- Lead times for glass fabrication and specialty drains
- Cure windows for membranes, mortars, and grouts (product-specific)
- Substrate correction work once demolition reveals conditions
- Late changes to tile selection or layout
Field case study: Residential steam shower + full bathroom gut remodel
In a full bathroom gut remodel, we rebuilt the enclosure into a spa-style steam environment with durability-first detailing and comfort upgrades. The steam shower was sized at 8 ft wide × 5 ft deep × 8 ft tall and finished in porcelain tile with a built-in bench and three niches.

Primary goals
- Build a premium steam shower with governed enclosure detailing and predictable humidity management.
- Support the use case with dedicated hot water capacity and fast delivery.
- Use ventilation controls designed for consistent real-world operation.
- Add comfort upgrades: heated floors and dimmable wet-rated lighting.
Key features delivered
- Steam generator system with dedicated controls and steam outlet fitting.
- Dedicated hot water capacity plus recirculation for improved response time.
- Dual ceiling exhaust fans placed for effective post-steam dry-out.
- Heated flooring with programmable thermostat and floor sensor.
- Bench + three niches placed for day-to-day usability.
FAQ: Steam shower waterproofing and vapor control
Do I need a vapor retarder in a steam shower?
Yes. Steam showers typically require a vapor-managed membrane strategy so steam does not drive moisture into cavities and adjacent finishes. Verify vapor performance in current documentation for your chosen membrane system.
- Choose a membrane documented for steam use.
- Keep the control layer continuous on walls and ceiling.
- Do not improvise around penetrations.
Should the ceiling be waterproofed in a steam shower?
Yes. The ceiling is directly exposed to steam and must be part of the continuous membrane layer.
- Plan the slope before board installation.
- Use a stable substrate and an overhead-approved tile-setting method.
Does the ceiling need to be sloped?
In most high-quality steam shower builds, yes. A sloped ceiling helps manage condensate dripping and improves user comfort. Coordinate slope with glass and tile layout early.
If using cement board, should the waterproof membrane go on top of or behind the board?
It depends on the method and manufacturer. Many systems use a surface-applied membrane for inspectability and continuity. Some methods allow other placements, but you should follow a documented steam-room method for your system.
Can gypsum drywall be used in a steam shower?
It is generally avoided. Industry guidance cautions against gypsum wallboard in steam room environments, and TCNA steam room methods do not incorporate gypsum wallboard in the assembly.
Are liquid waterproofing membranes acceptable for steam showers?
Yes, when the product is documented for steam use and applied at the required thickness with verified curing. The common failure mode is under-building thickness or rushing cure windows.
- Use wet mil thickness checks.
- Respect cure windows before testing and tiling.
- Do not rush coats or ignore pinholes.
What are the most common steam shower failure points?
Corners, penetrations, drain transitions, benches/niches, and poorly handled movement joints are the typical failure zones.
- Use corners and collars designed for your membrane system.
- Document waterproofing before tile covers it.
- Keep movement joints free of grout.
What sealant should be used at changes of plane?
Use a flexible sealant at changes of plane. Silicone is commonly specified for tile movement joints. Follow the system’s sealant compatibility guidance.
Do I need insulation if the steam shower is on interior walls?
Yes, insulation can still improve comfort and steam retention and reduce temperature swings. Use unfaced insulation unless a documented method specifies otherwise.
Want a steam shower assembly plan you can build from?
If you want a governed system plan for your exact enclosure, we can review the tile format, glass layout, drain strategy, and penetration schedule and turn it into a buildable scope.
Request an estimate Call 888-655-0064Privacy note: you can call without submitting a form.
Related Liamar resources
- Luxury kitchen and bathroom remodeling
- Project gallery
- About Liamar
- Financing options
- Contact
- Example of our technical blog style (reference)
About this guide, disclosures, and update policy
- Independence: This is not manufacturer-sponsored content and does not accept paid placement for systems or brands.
- Scope: Contractor field perspective. We are not performing laboratory testing for this article.
- Code note: Code acceptance and inspection requirements vary by jurisdiction and assembly design. Confirm with your local official.
- Updates: We update this page when TCNA guidance, manufacturer documentation, or field learnings change.
Sources and documentation (primary links)
Verify current manufacturer instructions and datasheets at time of installation. This article is informational and does not replace product documentation.
- TCNA Steam Rooms FAQ
- TCNA: Membranes in Steam Showers (perm rating + ASTM E96 Procedure E reference)
- International Masonry Institute: Steam Room Detail (SR614 reference)
- Custom Building Products: Steam Rooms and Steam Showers Technical Paper
- MAPEI: Installing tile in a steam room (perm rating + ASTM E96 Procedure E reference)
- Steam shower construction guidance (ceiling/floor slope references)